Building Emerald Cities: A Fantastical Collage Project for Creative Kids
"There’s no place like home..." especially when your home is made out of cardstock, glitter, and 18 inches of yellow brick fabulousness.
This lesson all started with a simple idea:
Let’s build Emerald City.
Not the literal one (though let’s be real, I’d totally live there if it came with a glittered teaching budget), but a version dreamed up by 4th and 5th graders using collage, color, and a bit of creative courage.
And y’all—it turned out more magical than a pair of ruby slippers in a tornado.
🏙️ What We Made
Each student created their own towering “Emerald City” using:
● Stacked paper shapes for buildings
● A spiraling yellow brick road made of drawn lines and cut paper
● Whimsical poppies blooming at the base of the city (because what’s Oz without a dramatic floral entrance?)
These weren’t tiny little index card crafts either—oh no.
These collages stood tall at 18 glorious inches, and once we lined them up together, it felt like we’d built an entire glittering skyline. The hallway turned into somewhere over the rainbow, and I was NOT mad about it.
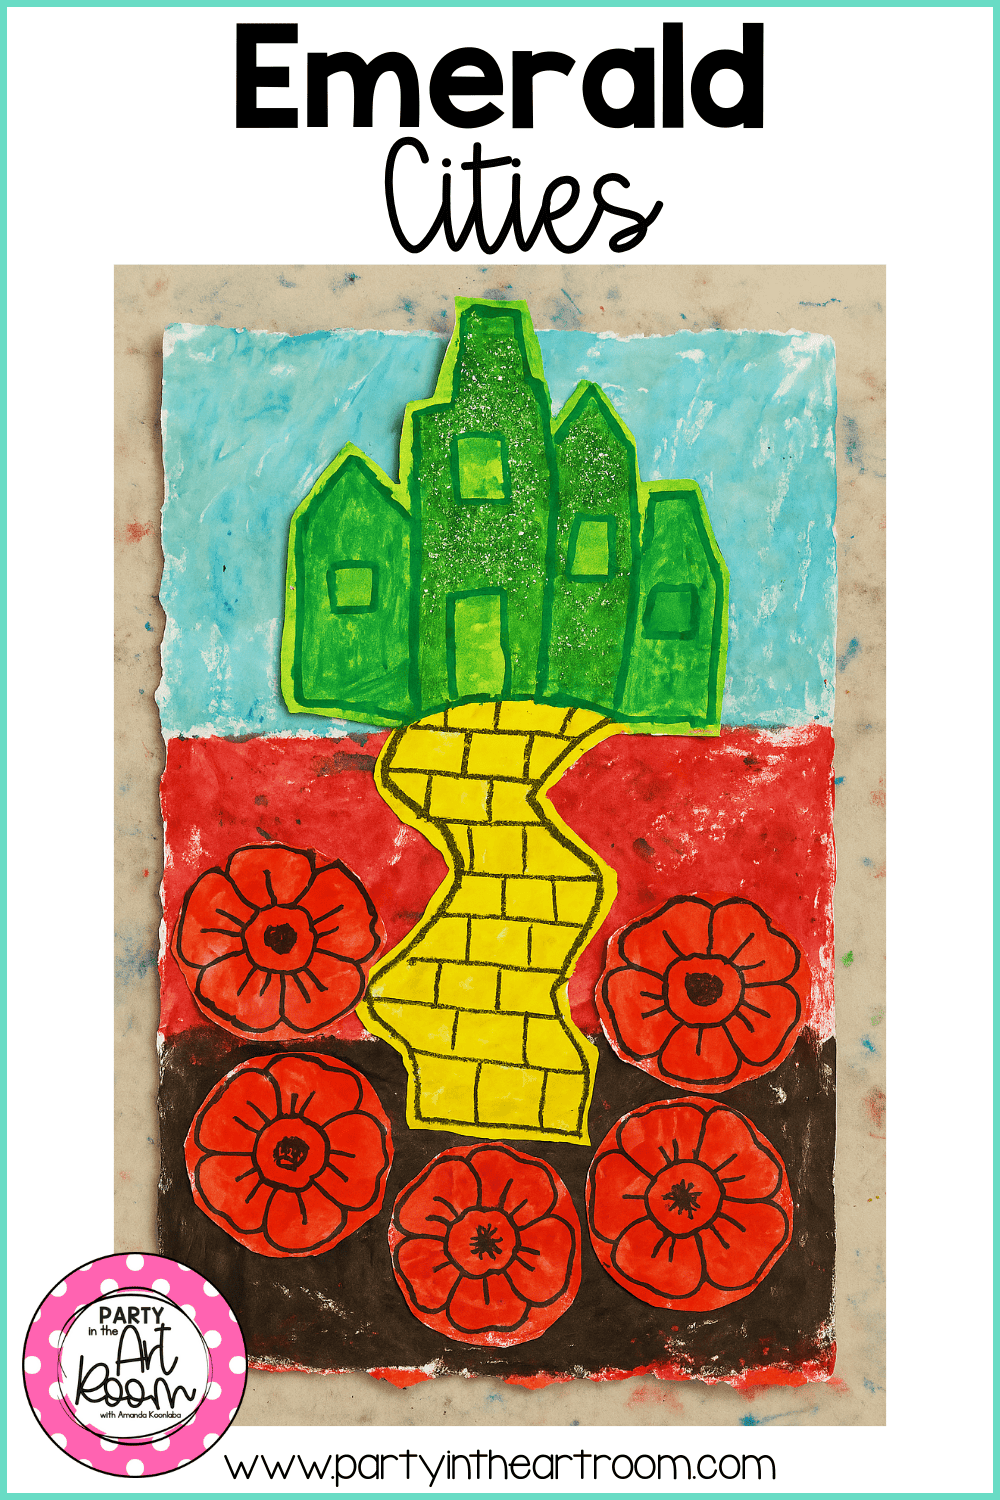
A tall emerald building shines against a painted backdrop with a yellow brick road and bright red poppies.
🎨 Art Concepts We Wove In
This project wasn’t just about making pretty things (though we definitely did that too). It was a full-on exploration of:
● Collage as a Fine Art Technique
Students layered construction paper and cardstock for texture and dimension. We talked about depth, balance, and how to make things pop.
● Fantasy + Familiarity
We started with something students already knew (The Wizard of Oz) and flipped it on its head. “What if YOU were the architect of Oz?” I asked. Cue the sketching frenzy.
● Sketching & Brainstorming
Before scissors ever touched paper, kids filled their sketchbooks with rough ideas: how tall should the buildings be? What should the poppies look like? Should their road zigzag or swirl? We leaned into creative decision-making and revision—because that’s where the real learning lives.
● Elements of Art
We explored line, shape, color, and texture, all while making something totally original.

A multicolor painted sky frames an emerald building with a bold yellow brick road and blooming poppies.
✂️ Materials We Used
To make these big, bold collages hold their own, we used:
● Tempera paint for backgrounds
● Construction paper & cardstock for layers (cardstock = sturdy + vivid)
● Scissors & glue (of course)
● Crayons, pastels, oil pastels, and markers for all the detail work
● Glitter because… do I even need a reason?
Pro tip: If you're working big like we did, go for the heavy-duty supplies. The cardstock really helped the buildings keep their shape and gave the finished work some oomph.

A speckled painted sky swirls behind an emerald tower and curved yellow brick road dotted with poppies.
💡 Extension Ideas & Resources
If your students loved this lesson (spoiler: they will), here are a couple of resources that pair perfectly:
🌸 Spring Bouquet Dice Roll Game
This one gets students playing with color, pattern, and floral design in a low-pressure way—awesome prep for those Oz poppies!
🐯 Rousseau Animals Art Lesson
A great way to explore dreamy, jungle-ish backgrounds and animal figures—perfect if your Emerald City kids want to add fantasy creatures into the scene.

An emerald building rises against a painted multicolor sky, rooted by poppies and a winding yellow brick road.
Final Thoughts from the Yellow Brick Road
What I love most about this project isn’t just the color or the scale or the wow factor (though, hello hallway display goals).
It’s that it shows kids how to take something familiar—a story they’ve heard a hundred times—and reimagine it with their own creative twist.
And when they step back and see their Emerald Cities, they realize something powerful:
They didn’t follow the yellow brick road.
They built it.
🌈✨
Want more collage adventures, sketchbook ideas, or big-display lessons? Come hang out over at Party in the Art Room—we’ve got scissors, stories, and sparkle for days.

An emerald building sits at the base, with a yellow brick road leading into a field of poppies.
More GREAT IDEAS:


Designed specifically for classroom use, these worksheets provide a template for your students to explore the concepts of tints and shades while developing their artistic skills. Whether you're looking for a way to enhance your art curriculum or just want to inject some creativity into your classroom, these worksheets are sure to inspire your students!

Check out discounts, deals, and recommendations on all our artsy faves!
Affiliate Disclosure: Party in the Art Room is supported by its audience. When you purchase through links on this site, a commission may be earned.
Get to know Amanda Koonlaba!
Hi! I’m Amanda. Teaching children to be creative thinkers is my greatest joy. I’m here to help you bring that same joy to your classroom.

This guide is packed with 25 ideas for using art to teach math and ELA. It’s arts integration for the win!

I want all students to feel successful in the art room, so I created a standards-based Daffodil Collage lesson to do just that! The lesson includes an artist study, student reflection, and more, so push your artists to their full potential.


Are you planning an abstract art lesson inspired by Paul Klee? Are your students going to create abstract portraits? Here’s an engaging and vibrant lesson to enhance your curriculum! This resource is an ideal addition to your elementary art plans, bringing creativity and excitement to your classroom.